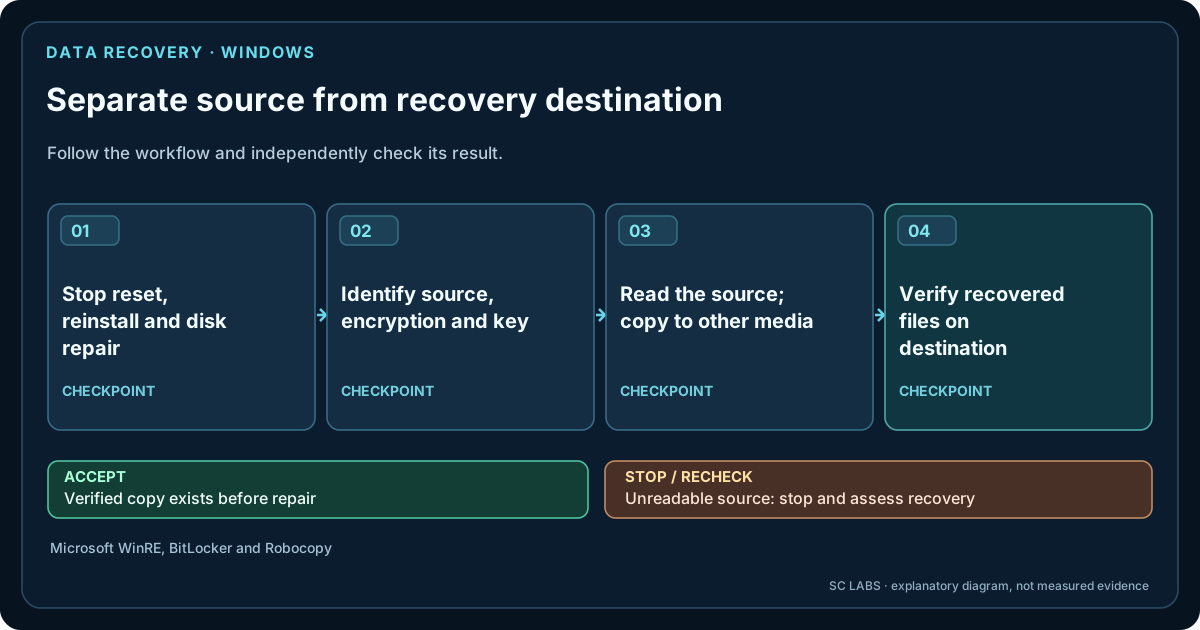
Why recovery should come before repair
Repair changes state. Recovery preserves state. If a PC contains valuable documents, profiles, application data or browser data, preserving that information first gives you a safer baseline before registry repair, filesystem repair, reinstalls or other changes.
This is especially important when you do not yet know whether the failure is caused by Windows, storage, boot configuration, encryption, hardware or something else.
1. Stop treating the installed Windows session as the only tool
If Windows will not start normally, use separate trusted recovery media. A small bootable Linux or WinPE environment can inspect storage without depending on the broken operating-system session.
The goal is not to make the recovery environment feature-rich. It is to give you a controlled place from which to identify disks, inspect filesystems and preserve data.
2. Identify the source before you touch it
Confirm which physical disk and partition contain the Windows installation. Do not assume that drive letters or device names match what you normally see inside Windows.
- Identify the disk by capacity, partition layout and filesystem.
- Locate the Windows installation and user-profile directories.
- Confirm the destination storage is separate from the source.
- Record what you intend to copy before you begin.
3. Prefer read-only access for the source
Where the filesystem and recovery environment allow it, mount or access the Windows source read-only during the preservation phase. That reduces the chance that an automatic repair, journal replay, metadata update or accidental command changes the evidence you are trying to save.
4. Copy to separate external storage
Use another disk or recovery USB as the destination. Preserve the user folders that matter and, when useful, the complete user profile rather than only the obvious Documents folder.
A complete profile can contain application settings and other useful context in hidden directories such as AppData. Whether you need those files depends on the recovery goal.
5. Verify the result
A successful copy command is useful evidence, but verification makes the result stronger. For an archive or image, record a cryptographic hash such as SHA-256 and recheck it after creation or transfer.
For a folder copy, also compare expected directories, file counts or selected important files. The point is to verify that the rescue artifact you intend to rely on actually exists and is readable.
6. Only then move into repair
Once the important data is safely preserved, you can decide whether repair is worth attempting. Possible next steps may include boot repair, filesystem checks, offline Windows repair, hardware replacement or a clean reinstall.
Those actions have different risk profiles. Keeping recovery and repair as separate stages makes it easier to reason about what can still be reversed.
Cases that need different handling
BitLocker: an encrypted Windows volume may require the legitimate recovery key or other authorised unlock method before data can be read.
Failing storage: a physically unstable disk may need imaging or specialist recovery rather than repeated ordinary file copies.
Deleted files: recovering files from unallocated space is a different workflow from preserving an intact user profile.
Filesystem damage: severe corruption can require specialist tools and may make ordinary read-only file access incomplete.
A real physical example
In a physical ARKTOR Rescue validation, SC LABS booted a Windows test PC from separate recovery media, mounted the Windows source read-only and archived the complete test-user profile to external media.
The archive contained 6,871 filesystem entries and approximately 1.1 GB of profile data. The resulting artifact was verified by SHA-256 after creation. The source Windows volume was not modified during the rescue operation.
That test does not prove universal hardware support, locked-BitLocker recovery, deleted-file carving or damaged-filesystem reconstruction. It proves the narrower and useful claim: the read-only-first preservation workflow worked on the tested physical machine.
Recovery checklist
- Boot from separate trusted recovery media.
- Identify the correct source disk and Windows volume.
- Use read-only source access where practical.
- Choose a separate destination with enough capacity.
- Preserve the required user data or complete profile.
- Verify the resulting files or archive.
- Record open limitations such as encryption or disk health.
- Begin repair only after the preservation step is accepted.
Official Windows recovery references
Microsoft’s Windows Recovery Environment documentation describes built-in repair tools; booting WinRE does not by itself make a source disk read-only. Protecting the source from writes is a separate recovery decision. For encrypted drives, Microsoft documents the BitLocker recovery-key requirement. For file copying on healthy readable storage, the Robocopy reference distinguishes ordinary copies from switches such as /MOVE and /MIR, which can remove source files or purge files at the destination. These references do not make a physically failing drive safe to operate; seek specialist recovery advice rather than repeatedly stressing damaged media.
The useful principle
When the operating system is unreliable, the first success condition is not “Windows boots again”. It is “the information we care about is safely preserved and independently checkable”.
Working with a recovery scenario?
Discuss the source, destination and constraints before writing to any disk. A pilot starts with a scoped conversation, not a promise of public product availability.
Discuss a scoped ARKTOR pilot